

The "old" V2.0.15 works way better here.
With .17 i can't even get a stable lock on the beacon.
The "old" V2.0.15 works way better here.
With .17 i can't even get a stable lock on the beacon.
PA3GUO: i am searching for the datasheet about one year now without luck.
It seems that this BLD was a special build for the customer.
Around here in this Thread: What TX amplifier do you plan to use?
73s
2e0saf: on a i5 3470 SDR-Console runs smooth, CPU load well below 10% @ (1024kHz BW)
73
Keine Bedenken das 13,8V die Schaltung beschädigen würden.
73
Wo ist das Problem anfangs kurz die PWM auf den Wert einzustellen das 12V am Lüfter ankommen und dann mit dem PWM runterzugehen? Machen viele Netzteile mit Lüfter so, z.B. Meanwell RSP/RST und die TDK-Lambda TX Serie,
Aber ich bin dann mal raus aus dem Thread.
Gruß
Für was die PWM verwendet wird ist schon klar.
Ein StepDown Wandler ist auch nichts Anderes als eine PWM Regelung.
Die Größe der Bauteile für die Glättung ist frequenzabhängig und da der Nano schon recht schnell schalten kann werden die benötigten
L/C nicht sehr groß, evtl. noch ein Snubbernetwork rein damit keine RFI entsteht.
Wenn du einen üblichen CPU-Lüfter nimmst ist normalerweise gleich ein oder zwei Anschlüsse zum erfassen der Drehzahl dran.
Könnte auf dem Display auch angezeigt werden.
Als Rail Switch nehme ich den IRF4905 > viel niedrigerer RDSon.
Natürlich muss dann die Gatespannung auf unter 20V gehalten werden. > Z-Diode
Den StepDown für den Lüfter kann man bei richtiger Programmierung der PWM und Glättung der Spg. auch sparen.
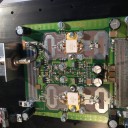
in the chematic you can see:
Arduino Nano:
ADC0 AD8313 Vdet
ADC5 -20dBm set
ADC6 Ubat
Answers that your question?
PA3AXO: of course, hours ago. PN here in the forum..
PA3AXO: you got PN
Why were the notes removed ?
is this commercial use ?
i was just about to start modifying the amp
jack
A eBay seller has linked to the modifications here without asking for permission first and earns a lot money selling his amps.
A lot of time on my side was invested in this modification and it was only intended for Ham use, without making money with that.
I have observed that for many months now and won't support that any longer.
There are still useful infos from other OMs available in this forum.
73s DB8TF
DJ0MY: you got PN
Waren schön zu sehen hier.
Zwei Gruppen mit jeweils 30 Punkten hintereinander.
Gut ich bin dann mal raus aus dem Thread...
Evtl. habe ich mich etwas unklar ausgedrückt.
"Abwickeln und anders herum aufwickeln" war gemeint.
säge die Helix auf 3,5-4,5 WIndungen ab und pack sie vorne an einen 60cm+ Spiegel dran.
Natürlich dann auf LHCP drehen.
Dann bist du mit den 2W vom BU500 dabei.
73s
diese "Barbecue" Grid Dish ist schon einiges besser als eine Helix allein.
https://www.rakuten.de/produkt…pzilla_CSS&cid=affiliate&
Leider auch linear polarisiert, also wieder 3dB verschenkt.
Sollte aber mit den 2W eigentlich für ein SSB QSO reichen.
Hatte schon mehrere OMs mit dieser Antenne und einem 2W (4 chinesische Watt) Chinesen WLAN Booster im QSO.
73s DB8TF
Ich hatte hier vor einer Woche einen BU500 mit der von dir beschriebenen Ausgangsleistung an einer 4 Wendel Helix und einer 72cm Offsetschüssel. Das Signal war im mittleren Transponderbereich vollkommen ausreichend. Am oberen (tauben) Ende etwas dünn.
Mit deiner 30 WIndungen Helix wirst du da nicht glücklich werden da Helixe allgemein bei etwa 16dB Gain an Ende sind egal ob du noch 100 Windungen mehr draufpackst.
Gruß DB8TF
Working good, level is exactly the same as from the original TCXO.
In the software select the 26MHz Ref and then multiply the wanted LO with 1,04.
With the control voltage of the Murata TCXO is also now a frequency finetuning possible.
73s DB8TF
Update: now the BU500 is running with an 0,2ppm Murata TCXO:
https://datasheet.octopart.com…a-datasheet-138713704.pdf
Test results following..
73s DB8TF